 |
|
 |
|
three points of contact | approaching | leading | tying | saddling | bridling | mounting and dismounting | headgear for the rider | riding | handling
Introduction: Whether working with a familiar, gentle horse or an unfamiliar or temperamental horse, safety is of the utmost importance. Using the "three-points-of-contact" principle and safe handling techniques, people can avoid injury most of the time.
Horses are animals of prey. To survive, their instincts tell them to either run or fight when they feel afraid or do not understand what is happening around them. This is an important fact to remember, especially when working around unfamiliar horses.
Three Points of Contact: The "three-points-of-contact" principle, which is simply touching the horse on at least three different points when working with it, addresses the basic need of the horse and human to communicate. Using this principle, one can accomplish two things: let the horse know what is going on and let the handler know what the horse is thinking. If the horse knows what is going on, it is less fearful of danger and less likely to run or strike. If the handler is in contact with the horse, he or she can feel if there is relaxation, trembling from fear, or tensing for a sudden move. The three point system also forces the horse and handler to be in constant contact. If the horse decides to make a sudden move, the handler will be pushed out of the way and hopefully towards safety.
Maintaining three points of contact, a triangle, allows a more physically stable and safe relationship between man and horse. Points of contact for a few common applications are discussed in the following information (Other points of contact, in addition to what are described, can also be effective):
|
|
|
|
|
|
The "Three Points of Contact" principle comes from Robert M. Miller, The Western Horseman (October 1990): 74-76.
The American Youth Horse Council's pamphlet on horse safety offers this
advice on handling horses in the following activities:
Approaching: Approach all horses from the front, never directly from the rear. Always notice a horse's expression before advancing. A horse should know a person is present and turn to face them. To get the horse’s attention, speak to the horse, touch the horse, or offer a treat. Startled horses often jump or kick.
Leading: Walk beside, not ahead or behind a horse. A position that is even with the horse's head or halfway between the horse's head and its shoulder is considered safest. Handlers should always turn the horse away from them and walk around it.
Use a long lead shank and both hands when leading. If the horse rears up, release the hand nearest to the halter to avoid being pulled up with the horse. Lead from the left (near side), using the right hand to hold the lead, near the halter. The excess portion of the lead should be folded, figure-eight style. When leading, extend the right elbow slightly toward the horse. If the horse makes contact with the handler, its shoulder will hit the person’s elbow first, moving them away. An elbow can also be used in the horse's neck to keep the head and neck straight as well as to prevent the horse from crowding the handler. A horse should be workable from both sides, even for mounting and dismounting.
Never wrap the lead shank or reins around the hands, wrists, or body. A knot at the end of the lead shank aids in maintaining a secure grip when needed for control. Never drape a lead shank or reins across one’s shoulders or neck. Do not wear jewelry around horses. When caught, rings can cut deeply into fingers, and dangling earrings or bracelets can get caught in reins or lead lines.
Be extremely cautious when leading a horse through a narrow opening, such as a door. Be certain to have firm control and step through first. Step through quickly and get to one side to avoid being crowded. When dismounting or leading the horse, the stirrup irons on an English saddle should be run up or dressed. The stirrups of a Western saddle can also catch on objects.
Use judgment when turning a horse loose. Lead the horse completely through the gate or door, and turn the horse around facing the direction from which it just entered. Then release the lead shank or remove the halter or bridle. Avoid letting a horse bolt when released. Good habits prevent accidents. To reduce the chances of becoming entagled, avoid using excessively long lead ropes. Watch the coils when using lariats or lunge lines.
Tying: Know and use the two basic knots every horse handler should know: The quick release knot - should be used whenever tying a horse with the halter rope. This knot allows one to release the horse quickly if the horse gets into trouble. The bowline knot - should be used when tying a rope around the horse's neck. The loop will not tighten up and the knot will not slip. Tie the horse far enough away from strange horses so they cannot fight. Tie a safe distance from tree limbs or brush to prevent the horse from becoming entangled. Tie horses with enough rope to allow comfortable movement but short enough to avoid becoming tangled or getting a foot over the rope. Never tie horses by the reins because they may pull back and break the reins or injure their mouth. Always use a halter. Be sure to tie to an object that is strong and secure to avoid the danger of breaking or coming loose if the horse pulls back. Tie to a post set in the ground, not to a rail on a fence. Never tie below the level of the horse's withers. If a horse has broken loose once, it is more likely to pull back again.
Saddling:
Western - Carefully check horse and tack before saddling. Make sure all
stitching is secure and the blanket is clean. Be sure the horse's back and the
girth area are clean. Place the off-side cinches and the right stirrup over the
seat. Stand with feet well back in the clear, and reach forward when saddling.
Swing the Western saddle into position easily, not suddenly. Dropping the saddle
down quickly or hard, may scare the horse. Go to the off side of the horse and
gently let the stirrup and cinches down. Do not let them abruptly hit the horse
on the belly or the leg.
When using a Western double-rigged saddle, remember to fasten the front cinch first. Unfasten the rear cinch first when unsaddling. Pull the cinch up slowly when tightening. Do not cinch too tightly at first. Fasten accessory straps (tie-downs, breast collars, martingales, etc.) after the saddle is cinched. Unfasten them first when unsaddling. The back cinch should not be so loose that the horse can get a hind leg caught between the cinch and its belly, or so tight that it irritates the horse. Before mounting, walk/turn the horse and tighten the cinch when necessary. Check the cinch three times: after saddling, just before mounting, and after riding a short distance.
English - Carefully check the horse and tack before saddling. Make sure all stitching on the stirrup leather, billet straps, and girth buckles is secure. Check the pad to be sure that it is clean. The stirrup safety bar should be down. The stirrups should be run up before placing the saddle on the horse's back. The girth should be across the seat. Stand with the feet well back from the horse, and reach forward when saddling. Place the pad high on the withers, then slide it backward onto the back. This smooths the horse's hair. Check the girth three times: after saddling, just before mounting, and after riding a short distance.
Bridling: Always untie a horse before removing the halter. Stand in close just behind and to one side (preferably on the left side) of the horse's head. Handle the horse's ears carefully. Keep control of the horse when bridling by re-fastening the halter around the neck. Be careful not to bang the horse's teeth when bridling or unbridling. Ask the horse to open his mouth by putting one or two fingers to the corner of its mouth. Be sure the bridle is properly adjusted to fit the horse before riding: 1) Check the bit. There should be one or two wrinkles at the corners of the mouth. 2) The throatlatch should be adjusted so that three fingers can be inserted between it and the horse's jaw. 3) The cavesson (if used) should be relatively tight. There should only be room for one finger between the cavesson and the nose. 4) The curb chain (if used) should be flat and not twisted. There should be room to insert two fingers between the chain and the horse's chin groove. Never let a horse eat when wearing a bridle. The horse may step on the reins or get its feet tangled in them. Also hay or grass may get caught in the bit and injure its mouth.
Mounting and Dismounting: Never mount or dismount a horse in a barn or near fences, trees, or overhanging projections. Sidestepping and rearing mounts have injured riders who failed to take these precautions. A horse should stand quietly for mounting and dismounting. To be sure the horse stands, the handler must have light control of its head through the reins.
English riders should "run up" the stirrups on English saddles immediately upon dismounting. The dangling stirrup may startle or annoy the horse. It is possible for the horse to catch a cheek of the bit or even a hind foot in a dangling stirrup iron when it is going for a fly. A dangling stirrup can also be caught on doorways and other projections while the horse is being led. After running up the stirrups, English riders should immediately bring the reins over the horse's head. In this position, the reins can be used for leading. Western riders should also bring the reins forward for leading immediately after dismounting.
Headgear for the rider: Medical studies show that the most common riding-related injuries are to the head. Many of these could be prevented or made less severe by the wearing of protective headgear. Protective headgear is a hat that stays on during a fall (not one that hits the ground before the rider) and cannot be pierced by a sharp object. These hats should also have extra padding inside to protect riders from concussion. There are protective riding hats available for both Western and English riders. Wear protective headgear that carries the appropriate approval. These hats have been shown to be effective in preventing head injuries.
Riding: When riding, wear boots with proper heels to prevent the feet from slipping through the stirrups. Always wear protective headgear, properly fitted and fastened. Keep the horse under control and maintain a secure seat at all times. Horses are easily frightened by unusual objects and noises. Unless one is familiar with the horse, only ride in an arena or other enclosed area. When a horse becomes frightened, remain calm, speak to it quietly, steady it, and give it time to overcome its fear. If the horse is frightened and tries to run, turn him in a circle and tighten the circle until he stops. Hold the horse to a walk when going up or down a steep hill. Allow a horse to pick his way at a walk when riding on tough ground or in sand, mud, ice, or snow where there is danger of slipping or falling.
Do not fool around. Horseplay is dangerous for the rider and to others. Never ride a horse with just a halter. Halters do not give the rider enough control. Use a bridle. Try to avoid paved or other hard-surfaced roads. Walk the horse when crossing paved roads. When forced to ride along the road, ride on the shoulder. Follow the rules of the road, and get a driver's manual from the Department of Motor Vehicles. These rules vary from state to state.
Because it startles both horses and riders and frequently causes accidents, never rush past riders who are proceeding at a slower gait. Instead, approach slowly, indicate a desire to pass, and proceed cautiously on the left side. Ride abreast or stay a full horse's length from the horse in front to avoid the possibility of being kicked.
Do not let a horse run to and from the stable or place it is kept. Have the horse walk the last distance. If spurs are used, be sure to keep them steady enough that they do not touch the horse by mistake. For many inexperienced riders, it is best to not wear spurs. Dogs and horses are not always good companions. Keep any dogs under control at all times.
Handling: Wear boots or hard-toed shoes to protect the feet. Tennis shoes, moccasins or barefeet are easily smashed if the horse steps on them. When working around a horse, tie the horse securely or have someone hold the horse with a lead rope. Use cross-ties when possible, but be sure they have panic snaps or are secured with a breakable tie, such as baling twine.
If it is necessary to leave a halter on a loose horse, the halter must be a breakaway type. If the halter is too loose, the horse may catch a foot in it, especially if it is trying to scratch its head with a hind foot. A loose halter may catch on fence posts or other pasture objects. Some halter materials will shrink if they get wet, so check the fit.
Always work close to a horse and as near the shoulder as possible. This will prevent being struck with the full force of the horse’s feet. It is also important to stay close to the horse’s body when working about the haunches or passing behind the horse. This will also prevent being struck with the full force of the horse’s hind feet. Never stand directly behind a horse or directly in front of it. To work with its tail, stand to the side of the horse, near the point of the buttock, facing to the rear. Grasp the tail and draw it around to you. Do not drop grooming tools under foot while grooming. Place them where they will not be tripped on and where the horse will not step on them.
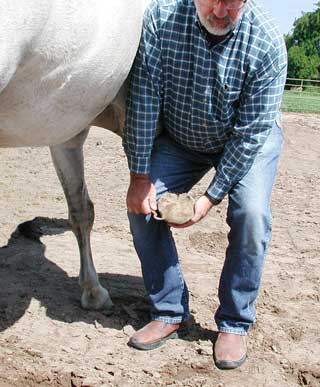
Know each horse, its temperament and reactions. People that work around horses should control their temper, be firm, but be calm. A nervous handler can make a nervous horse. Always let a horse know what is going to happen. When picking up the feet, for example, do not grab the foot hurriedly. This will startle the horse and may cause it to kick. When lifting the foot, touch the shoulder or hindquarter, and then run a hand down the leg. When at the fetlock say "up," and squeeze the joint. The horse should pick up its foot.